First part

Learning objectives:

  • Describe event-driven programming
  • Conceive a simple application with a graphical user interface
  • Implement a callback function
  • Apply the concept of inheritance to conceive an application
  • Conceive a class that implements an interface

Conponent vs Container

In order to program graphical interfaces, you will need to understand the concepts of component and containers. Each object in a GUI plays a precise part in the visual aspect of the application.

  • The graphical components such as text fields (JTextField), the buttons (JButton), the list (JList) and labels (JLabel) and many others are used as base elements for your interface and must be place within a container.
  • The containers such as the frame (JFrame), the dialog box (Jdialog) the panels (JPanel) and many others are used to contain the base elements in a specific layout (LayoutManager). We place the elements from left to right (flowLayout), in a grid format (GridLayout), by separating the containers in zones (BorderLayout) and others. A container can also contain sub-containers.

Consult Figure 0 below. It is a simple example that shows the base principle of a graphical interface. The panels, denoted by a blue rectangle are used as a container for the different base components. In red is the frame that is used to contain the panel. Identify the type of layout used for each of the 3 panels.
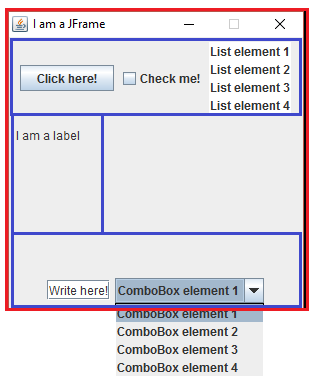
SimpleGUI Figure 0 : The GUI components

Exercise

Take the time to test the different possible layouts through this laboratory. You will need some practice to master graphical containers and components. Complete the following code to obtain the same window as Figure 1.

import javax.swing.*;
import java.awt.*;

 public class MyFirstGUI{

  public static void main(String[] args){

	JFrame myFrame = new JFrame();
	//set the title
	myFrame.setTitle("My first Window");

	//set the size to 500X300 pixels (width by heigth)
	myFrame.setSize(500, 300);

	//set the object to the middle of our screen
	myFrame.setLocationRelativeTo(null);

	//end program when user closes the window
	myFrame.setDefaultCloseOperation(JFrame.EXIT_ON_CLOSE);


	//create a panel
	JPanel myPanel = new JPanel();
	//add a label to the panel
	myPanel.add(new Label("My first panel"));
	//set panel background color
	myPanel.setBackground(Color.green);
	//add the panel to the frame
	myFrame.add(myPanel, BorderLayout.NORTH);

	//YOUR CODE HERE


	//set the window to visible
    myFrame.setVisible(true);
	}

}
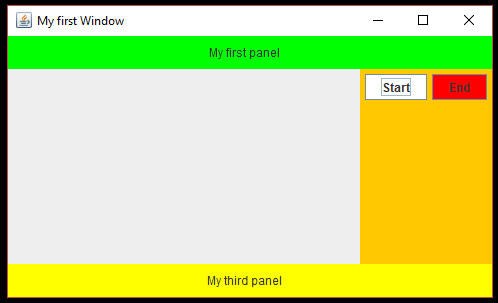
SimpleGUIExample Figure 1 : My first GUI

    The packages

    To make the classes more accessible to the compiling unit, you will need to use many import packages. Two packages will be very useful to program graphical user interfaces:

    • The package java.swing contains the basic graphical swing classes:
      • The graphical component classes (such as JButton, JTextField and JLabel)
      • The graphical container classes (such as JFrame, Jpanel, Jdialog and JScrollPane)
      • The graphical layout managers (such as FlowLayout, BorderLayout and GridLayout)
    • The package java.awt contains the personalised class (such as Graphics, Color and Font). Event handling is also included in this package.

    It is possible in Java to import a package and all classes that it contains by using the star “*” instead of the name of the desired class (see example above). It is however not a good practice because you would be importing classes that are not useful to your program, diminishing the efficiency of your program.

    import javax.swing.*; 

    Event based programming

    As mentioned before, java.awt.event takes charge of handling the events. For this lab, we will use:

    • The event classes (such as ActionEvent, MouseEvent, KeyEvent and WindowEvent)
    • Event listening interfaces (such as ActionListener, MouseListener, KeyListener and WindowListener)

    Here are some key concepts for event handling in Java:

    • All graphical components can be the source of an event. For example, a button creates an event when the user click on it, a text field creates an event when the user types “enter”
    • All classes can handle one or many event type, they only need to:
      • Implement the method(s) of an interface
      • Add the instance to the list of event handler of the graphical component that generated the event

      The objects handling the action event (such as a button click) have to implement the interface ActionListener.

    • The event that is generated by a component is sent to all handlers registered with this component.

      The source has a method addActionListener with a parameter of type ActionListener.

      Since the handler implements the interface ActionListener, the source knows that the handler has the method actionPerformed(ActionEvent event).

    Counter

    Let’s re-examine the Counter example viewed in class. This example follows the concepts of Model-View-Controller

    Model:

    The model in this example is a Counter that increments an integer by 1, or resets it to 0 depending on what button is pressed. The class Counter implements this model using the necessary methods (increment, getValue, reset)

    public class Counter {
    	private int value ;
    	public Counter () {
    		value = 0 ;
    	}
    	public void increment () {
    		value++;
    	}
    	public int getValue () {
    		return value ;
    	}
    	public void reset () {
    		value = 0 ;
    	}
    	public String toString () {
    		return "Counter : { value="+value+"}" ;
    	}
    }
      

    View:

    We want to have multiple views for this Counter (2 views), but we want the program to interact with these views in the same manner. To do so, we create the interface View. This interface will act as a contract between the class that implements the interface View and the class that will interact with them. In this case, we can be certain that every class implementing the interface View will have the method void update().

    public interface View {
    	void update () ;
    }
      

    There are two types of views that implements the interface View. The first one, TextView, is a textual representation of the counter which prints out the number of the counter. Note that it implements the method void update().

    public class TextView implements View {
    	private Counter model ;
    	public TextView (Counter model) {
    		this.model = model ;
    	}
    	public void update() {
    		System.out.println(model.toString()) ;
    	}
    }
      

    The second view is the GraphicalView; this view is a Graphical User Interface (GUI) for the counter. This class extends Jframe, allowing it to have a graphical representation.

    In the constructor of this view, we include as a parameter the model (Counter) as well as the controller (Controller) (see below). In the constructor we use " setLayout (new GridLayout(1 ,3)); ”, which divides the window in 1 row and 3 columns. This creates 3 positions where we can insert elements like buttons. To add buttons we follow these four steps:

    • Declare the button (of type JButton)
    • Initialize the button
    • Add an ActionListener to the button
    • Add the button to the frame (using the add function)

    We can also use a JLabel to display text.

    We will need some additional lines to setup the window properly:

    • setDefaultCloseOperation(JFrame.EXIT_ON_CLOSE); ” means that closing the window will close the application
    • setSize(300, 100);” sets the size of the window (x axis, y axis)
    • setVisible(true); ” enables the window to be displayed
    import java.awt.*;
    import java.awt.event.*;
    import javax.swing.*;
    
    public class GraphicalView extends JFrame implements View {
    	private JLabel input;
    	private Counter model;
    	public GraphicalView (Counter model, Controller controller) {
    		setLayout (new GridLayout(1 ,3));
    		this.model = model;
    		JButton button;
    		button = new JButton("Increment");
    		button.addActionListener(controller);
    		add(button);
    		JButton reset;
    		reset = new JButton ( "Reset" );
    		reset.addActionListener ( controller );
    		add(reset);
    		input = new JLabel ();
    		add(input);
    
    		//setup
    		setDefaultCloseOperation(JFrame.EXIT_ON_CLOSE);
    		setSize(300, 100);
    
    		//display the window
    		setVisible(true);
    	}
    	public void update () {
    	input.setText(Integer.toString(model.getValue())) ;
    }
    }
      

    Controller:

    We then have the Controller; this class handles the logic and communication of the application. This class has to implement ActionListener in order to be able to handle events thrown when the user clicks on a button.

    This controller has an array of View, when the Controller is constructed; this array is populated with a GraphicalView and a TextView. The controller has a method update() that calls the method update() of every registered View.

    The method ActionPerformed(ActionEvent e) is called each time that the GUI performs an action. This method verifies which action has been performed and reacts accordingly. It then updates the views.

    import java.awt.event.*;
    
    public class Controller implements ActionListener {
    
    	private Counter model;
    
    	private View[] views;
    	private int numberOfViews;
    
    	public Controller(){
    
    		views = new View[2];
    		numberOfViews = 0;
    		model = new Counter() ;
    		register(new GraphicalView(model, this));
    		register(new TextView(model));
    		update();
    	}
    	private void register(View view) {
    		views[numberOfViews] = view;
    		numberOfViews++;
    	}
    	private void update() {
    		for (int i = 0; i < numberOfViews; i++) {
    			views[i].update();
    		}
    	}
    
    	public void actionPerformed ( ActionEvent e ) {
    
    	if(e.getActionCommand().equals("Increment")) {
    		model.increment ();
    	} else {
    		model.reset();
    	}
    
    	update();
    	}
    }
      

    Application

    Finally we have the class App that has a main method allowing the execution of the counter.

    public class App {
    	public static void main(String[ ] args) {
    		Controller controller;
    		controller = new Controller();
    	}
    }
      

    1. Timer

    For this exercise, you will need to make an application that has a Graphical User Interface that represents a timer.

    Template files:

    The Timer has 6 buttons, one that will increase and one that decreases hours, minutes and seconds respectively.

    To create the Timer, we will base ourselves on the Counter example.

    To adapt the code for the Counter to implement the Timer, we will need to change the model, the view, and the controller.

    Model:

    The previous model was the Counter; we need to replace this class with a new class Timer. The class Timer has:

    • Three methods that increments the: hours, minutes and seconds respectively
    • Three methods that decrements the: hours, minutes and seconds respectively
    • Three methods that returns the: hours, minutes and seconds respectively
    • We also need to respect the 24 hours cycle:
      • The hours are between 0 and 23
      • The minutes are between 0 and 59
      • The seconds are between 0 and 59

    View

    You will need to modify the class GraphicalView so that it creates 6 buttons (to increment/decrements hours, minutes, and seconds) as well as a label (JLabel) that indicates the time. We will use a 2 (rows) by 3 (columns) grid to accommodate all these elements.

    Controller

    In the Controller, you will need to modify the method “public void actionPerformed ( ActionEvent e )” to accommodate the 6 actions launched by the 6 buttons of the GraphicalView and call the corresponding methods from Timer.

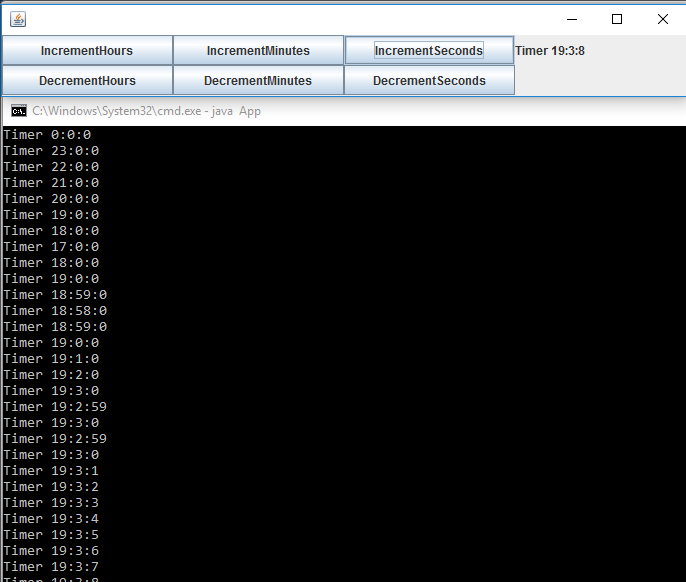
    Here is an example of the result:
    paint

    Figure 2 : Timer

Second Part

Exercice 2: Red dot

Here is an application with a zone where a red dot will be shown along with some buttons. When the user clicks on the left button, the point will move to the left, same logic applies to the right, up, and down button. This application was adapted from an example of Decker & Hirshfield (2000) Programming.java

2.1 Create the graphical representation

2.1.1 Display Area

Create a sub-class of the class JPanel named DisplayArea. An object of the class DisplayArea will be used as a canvas (an area on which the application will draw). Later, we will add what is needed to move the colored point or square on this surface.
You can read more about the class JPanel here:https://docs.oracle.com/javase/8/docs/api/javax/swing/JPanel.html

To make the name JPanel available in this compiling unit, add the following import directive to the beginning of your file, before the class declaration:

import javax.swing.JPanel; 
  • Declare a constant (a public static final class variable) named DISPLAY_SIZE with the value of 500
  • Add a constructor in which you will call the method setBackground to change the background color of this component. Use the color java.awt.Color.WHITE. You can simply use Color.WHITE if you have imported java.awt.Color at the beginning of your file with the other import directives.
  • Finally, you will need to redefine the method getPreferredSize. This method returns an object of type java.awt.Dimension, or simply Dimension if you have imported java.awt.Dimension. The method getPreferredSize has to return a new object Dimension whose width and height is DISPLAY_SIZE.

What did we get? When an object DisplayArea will be created, there will be all the characteristics of the class JPanel. However, the background component will be White. When the application will try to determine the size of this graphical application, there will be a call to the method getPreferredSize. This method will return a new object Dimension with the width and height of 500 pixels.

2.1.2 GUI (Graphical User Interface)

Create a subclass of the class JFrame that you will name GUI. This will be the main window of the application.
You can read the documentation about the class JFrame here:https://docs.oracle.com/javase/8/docs/api/javax/swing/JFrame.html

You will need to import the package java.swing.JFrame to make the name JFrame available.

import javax.swing.JFrame; 

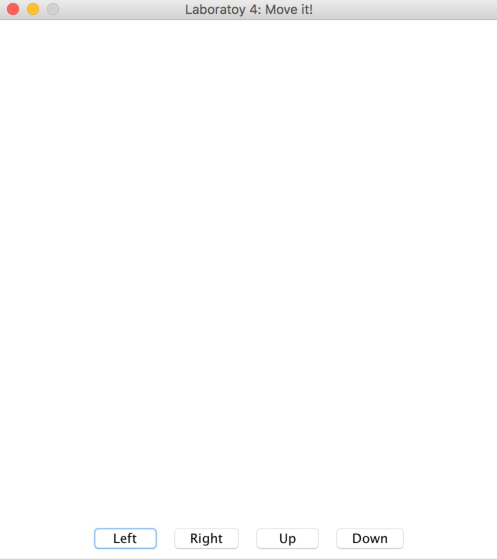
Add a constructor to the class GUI. In a graphical application, the constructor is usually the place where we construct the graphical representation of the application. This is logical since the constructor is called the moment the object is created. Here is the desired visual:

le rendu visuel recherché. Figure 2 : the desired visual

To obtain a window like this, you will need to add the following elements to the constructor

  • Add a title to the window. This can be done in two different ways: by calling the constructor of the superclass and passing the title as a parameter (as a String) or by using the method setTitle.
  • It is necessary to add a call the method System.exit when we close the window.
    setDefaultCloseOperation(EXIT_ON_CLOSE);

    You can consult the documentation at the following address for more information: https://docs.oracle.com/javase/8/docs/api/javax/swing/JFrame.html#setDefaultCloseOperation-int-

  • Create an object DisplayArea and add it to the center of the window. Since the class GUI is a subclass of the class JFrame, we can use the LayoutManger. Chose the one that will allow you to add the object DisplayArea to the lower part of the window
  • Add the buttons to the lower part of the window. To do so, follow these steps:
    • Create an object JPanel. It will act as a container for the buttons. Make sure that the background of this component is white.
    • Create four object of the class JButton. Use the labels “Left”, “Right”, “Up”, and “Down”.
    • Add these buttons to the object JPanel. Note that the default layout of JPanel is FlowLayout. This layout places the object from left to right then up to bottom based on the order that the elements have been added.
    • Add an object of type JPanel to the class GUI. Since GUI is a subclass of JFame, it should be easy to add the panel at the desired position.
  • Finally, add the two calls to the following methods to the constructor. These methods have been inherited from the parent classes. The method pack is inherited from the class java.awt.Window, and setResizable from the class java.awt.Frame.
    setResizable(false);
    pack();

    The first call makes the size of the application fixed, while pack determines the ideal size of the window based on its elements. This call to the method pack forces a call to the method getPreferredSize() from the class DisplayArea.

  • Add a main method of the class GUI. This method has to create an object of the class GUI. The main method also has to make the window visible. To do so, use the method setVisible like it the previous section.
  • Compile your application and make sure it resembles the application above.


If you click on the buttons, you will see that nothing happens. We will need to add an event handler to associate actions with each click of a button.

2.2 Event Handler (Part 1 of 3)

You must now modify the application to handle events. To do this, you will need to modify the constructor of the GUI class to add (register) an event handler for each button. What class will be responsible for this work? When a button is clicked, the application must modify the canvas ( DisplayArea ). Changing the DisplayArea class so that it serves as an event handler seems a natural choice.

  • Add an import directive to make the java.awt.event.ActionListener available to the DisplayArea class.
  • Modify the declaration of the DisplayArea class to make the ActionListener interface. Compile the class now. What error message do you get?
  • You should get a message like this:
    DisplayArea.java:6: error: DisplayArea is not abstract and does not override
    abstract method actionPerformed(ActionEvent) in ActionListener
    public class DisplayArea extends JPanel implements ActionListener {
           ^
    1 error 

  • Therefore the actionPerformed (ActionEvent e) method needs to be implemented.
  • For now, our implementation of the actionPerformed method will only display one message, for example, "actionPerformed was called".
  • Modify the constructor of the GUI class, each button has an addActionListener method, use this method to add the DisplayArea as a handler with each of them.

You can now compile and test the application. Each time one of the two buttons is clicked, the message "actionPerformed was called" will be displayed on the console.

2.3 paint (Part 1 of 2)

Whenever AWT needs to display our DisplayArea object, it invokes paint (Graphics g) . Modify the DisplayArea class.

  • You will need to add an import directive, along with the other import directives at the beginning of the file, to make the java.awt.Graphics name available.
  • You must redefine the paint (Graphics g) method.
  • Implementing the paint method will do two things:
    • First, it will use the paint method of the superclass. To do this, add the super.paint(g) call as the first statement of the paint method. This way all the work of the paint method inherited from the JPanel superclass will be done first, and then there will be the specific work of our subclass.
    • Next, simply display a "paint was called" message.
  • Modify the actionPerformed method. After calling the println method, add a repaint method call without arguments.

Compile and test the application.

  • When the application is first shown on the screen, you should see the "paint was called" message in the console.
  • Click on the buttons. Calling the repaint method in the actionPerformed method will force a call to the paint method. You should see the message "paint was called" displayed in the console.

2.4 Event Handler (Part 2 of 3)

There are four buttons. How can the actionPerformed method determine the button that was clicked by the user?

The parameter of the actionPerformed method is a reference to an object of the ActionEvent class that was generated at the time the user clicked the button.

  • Modify the actionPerformed method. Specifically, concatenate the result of a e.getActionCommand() method call to the println method message. Here, e is the parameter name of the actionPerformed method. Here is my actionPerformed method.
    public void actionPerformed(ActionEvent e) {
        System.out.println("actionPerformed was called: " + e.getActionCommand());
        repaint();
    }

With this change, you should get the following printed on the console, if you click the "Right", "Up", "Down", and then "Left" buttons.

 java GUI
paint was called!
paint was called!
actionPerformed was called: Right
paint was called!
actionPerformed was called: Up
paint was called!
actionPerformed was called: Down
paint was called!
actionPerformed was called: Left
paint was called!

We will therefore use getActionCommand to distinguish the different situations.

public void actionPerformed(ActionEvent e) {

    String command;
    command = e.getActionCommand();

    if (command.equals("Left")) {
        ;
    } else if (command.equals("Right")) {
        ;
    } else if (command.equals("Up")) {
        ;
    } else if (command.equals("Down")) {
        ;
    } else {
        ;
    }
    repaint();

}

2.5 paint (Part 2 of 2)

All that remains is to draw a point on the screen and move it in the right direction each time the user clicks on one of the buttons.

  • The DispayArea object must memorize the current position of the point on the screen. To do this
    • Add an instance variable of type java.awt.Point .
    • In the constructor, initialize this variable so that the initial position of the point is in the center of the DisplayArea object.
  • See the documentation for the Graphics object for a list of available methods.
  • Modify the method paint:
    • Using a call to the setColor method, change the default color that draws on the graphical surface (the object designated by g).
    • Draw a circle on the graphical surface (object designated by g ) using its drawOval method. Draw the circle at the current position (that of the instance variable of type Point ).

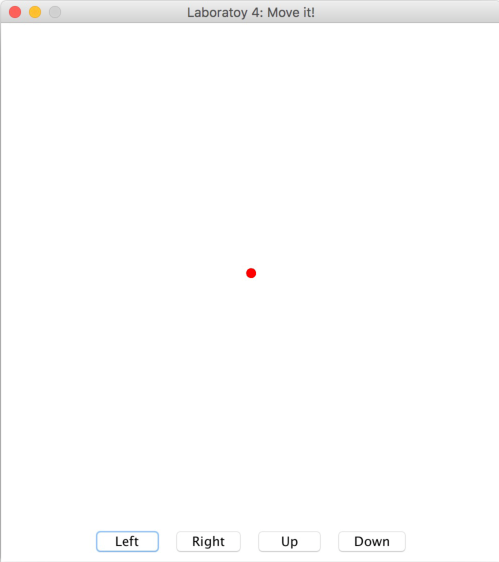
Your application should now look like this:

paint

Figure 2 : paint

2.6 Event Handler (Part 3 of 3)

Now you need to change the actionPerformed method to move the point in one of four directions, depending on which button the user clicks.

  • If the user clicks the "Left" button, move the point 10 pixels to the left and make a call to the repaint method. This call to repaint will force a call to the paint method that will display the point at its new position.
  • If the user clicks the "Right" button, move the point 10 pixels to the right and make a call to the repaint method. This call to repaint will force a call to the paint method that will display the point at its new position.
  • If the user clicks the "Up" button, move the point 10 pixels up and make a call to the repaint method. This call to repaint will force a call to the paint method that will display the point at its new position.
  • If the user clicks the "Down" button, move the point 10 pixels down and make a call to the repaint method. This call to repaint will force a call to the paint method that will display the point at its new position.

Compile and test your application.

2.7 JComboBox

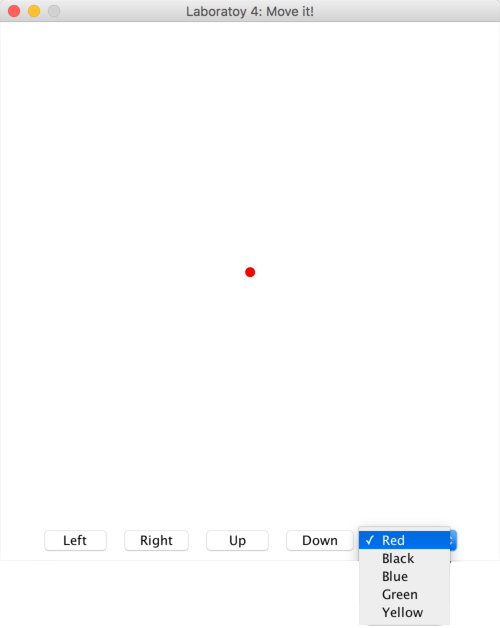
We now want to add a drop-down menu to change the color of the point.

paint

Figure 3 : paint

To do this we will use a JComboBox object.

  • https://docs.oracle.com/javase/8/docs/api/javax/swing/JComboBox.html
  • You must modify the constructor of the GUI class:

    • Add a JComboBox object to the JPanel object at the bottom, to the right of the "Down" button.
      String[]colors;
      colors = new String[] { "red", "black", "blue", "green", "yellow" };
      JComboBox colorList;
      colorList = new JComboBox(colors);

    Note that JComboBox takes an array of String parameters. These strings will be used to identify ActionListeners

    • Make sure the DisplayArea object is the event handler for this drop-down menu.

    We now need to change the actionPerformed method of the DisplayArea class to change the color of the point based on the color selected by the user. The e.getActionCommand() call will return the "comboBoxChanged" string when the user selects an item from the drop-down menu.

    • First, add a new instance variable of Color to the DisplayArea class.
    • Modify the constructor to assign a value to the instance variable of type Color .
    • Modify the paint method so that the color of the point is that of the Color type instance variable.
    • Finally, add a new case to the actionPerformed method. When getActionCommand() retrieves "comboBoxChanged", get the color selected like this:
      if (e.getSource() instanceof JComboBox) {
      
      	    JComboBox cb;
              cb = (JComboBox) e.getSource();
      	    String color;
              color = (String) cb.getSelectedItem();
      
      	    if(color == "red"){
      		currentColor = Color.RED;
      	    }

      Here, currentColor is the name of my Color instance variable. One of the statements is quite complicated. Let's look at each of the statement's parts.

      • The getSource() method returns a reference to the object that is the source of the event. In this case, we know this is the JComboBox object because the getActionCommand() method returned the "comboBoxChanged" string. So we can safely force the type (cast type) like this: (JComboBox)e.getSource() .
      • We now call the method getSelectedItem() and we force its type.

    2.8 Additional Exercises (Challenges)

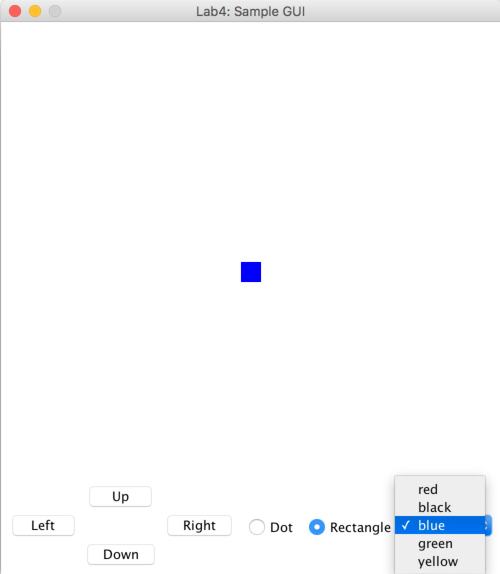
    If time permits, modify the application to embellish the interface and add functionality to choose the shape of the point, either a square or a circle.

    Sample GUI

    Figure 4 : Sample GUI

    Use the following graphical elements:


Third Part

Puzzler

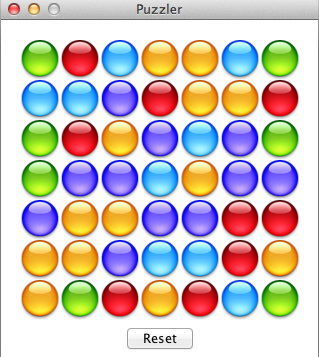
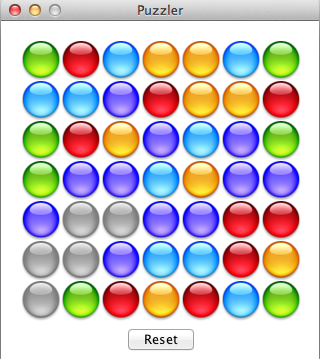
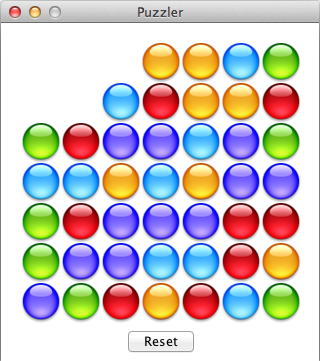
The game Puzzler consists of a 7 × 7 board. Initially, all the cells are filled with marbles from one the five available colors. When the user clicks on a cell for the first time, the cell and all the adjacent cells of the same color are selected. The marbles are gray to indicate this state of the game. When the user clicks a second time on a selected cell, all the selected cells vanish. Marbles fall from top to bottom, and left to right, in order to fill the empty spaces. To win the game, the user must make all the marbles vanish.

Puzzler 1 Puzzler 2 Puzzler 3

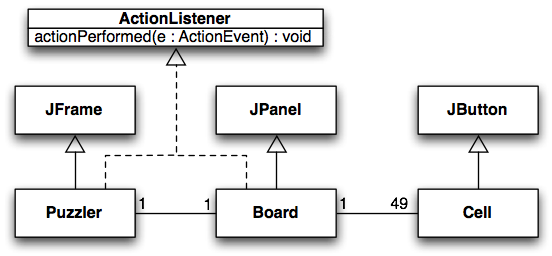
This Java implementation consists of three classes: Puzzler, Board, and Cell.

Class Diagrams

Figure 5 : Sample GUI

You can clearly see the important role of inheritance and interface for this application. Each of the three classes is derived from an existing class. The application needs a main window, which is called here Puzzler, and this is a subclass of JFrame.

We need an object to model the grid onto which all the marbles will be placed. Since the object has access to all the marbles, it will also be responsible for implementing the logic of the game. The class JPanel will provide the means to display the marbles, this will be the class Board.

Finally, the tiles of the Board game are implemented using objects of the class Cell, a subclass of JButton.

The key idea for this implementation is as follows. When a cell vanishes, it simply displays a white square. In order to simulate marbles falling from top to bottom, and left to right, we simply change the type of the source and destination cell. For instance, if a blue marble at position (i,j) moves to position (i′,j′). We simply set the type of the cell at position (i,j) to represent the empty cell, whereas the type of the cell at position (i′,j′) becomes that of a blue marble.

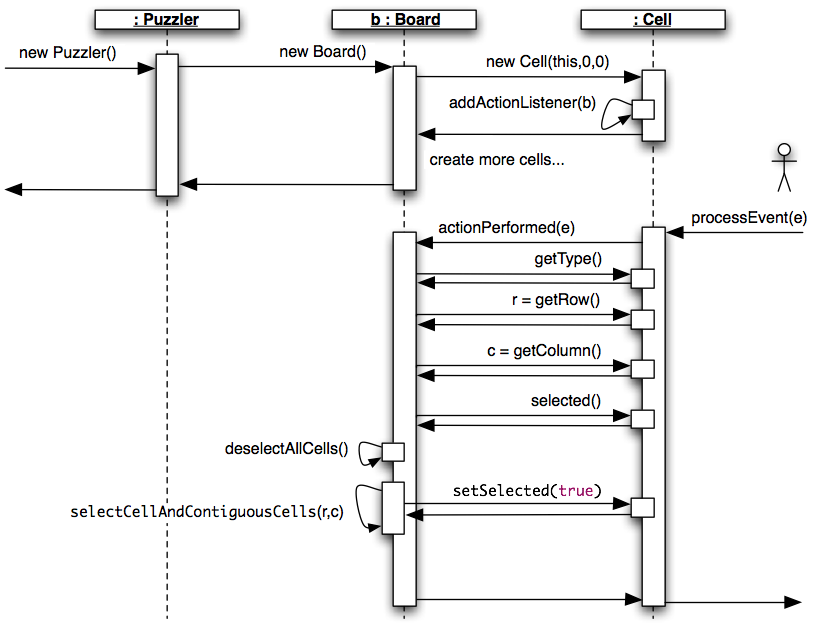
The UML sequence diagram on the page illustrates some of the important sequences of method calls. When the constructor of the class Puzzler is called, it will create an object of the class Board. The constructor of the class Board will itself create Cell objects. The diagram shows one such object creation. The constructor of the class Cell receives a reference to the Board object, which will serve as an action listener for this Cell (call to addActionListener(b)).

The second part of the diagram illustrates a possible sequence of method calls resulting from a mouse click. When the user clicks the button, an object is created to represent this action, the method processEvent of the button is called. The button will then call the method actionPerformed of its action listener (the object that was registered using the method addActionListener, as above). The Board will determine the source of the event. The method actionPerformed interacts with the cell to determine its type, row, and column. If the cell was not selected, all the cells are deselected, and all the adjacent cells are selected, this will include a class to the method setSelected of the selected cell, which changes the image to that of a gray marble. Eventually, the control returns to the caller.

Puzzler Sequence

Figure 6 : Puzzler Sequence

The first link allows you to download the application, while the second is an application that you can double-click to launch.

The game Puzzler is a Java implementation of a JavaScript application developed by Apple. (Puzzler, Puzzler.zip).


Part Four

Create and submit a zip folder (1 point)

Instructions

  • Create a directory lab7_123456, where 123456 is replaced by your student number.
  • Inside this directory, place the 5 .java files for this lab. Include only your source code. Do not include any class files or any other files; only Java files.
  • In this directory, also create a file README.txt which is a text file containing your name, student number and a brief description of the content of the directory:
    
    Student name: Jane Doe
    Student number: 123456
    Course code: ITI1121
    Lab section: B-2
    
    This archive contains the 6 files of lab 7, that is, this file (README.txt),
    plus Controller.java, Timer.java, View.java, GraphicalView.java, TextView.java.
    
    						
  • Create a zip file lab7_123456.zip containing the directory lab7_123456 and all of the java files.
  • Verify that your archive is correct by uncompressing it somewhere and making sure that all the files and the directory structure are there.
  • Submit the archive using https://uottawa.brightspace.com/

Important remarks!

We are using automated scripts to test and grade your lab submission. Therefore, you must follow these instructions exactly. In particular:

  • Your naming of all the files and methods must be exact. Use the starter code provided during the lab to avoid problems.
  • You MUST submit a .zip; not individual files; not a .rar, not a .7z, or anything else.
  • There are two rounds of grading. The first round is optional. If you submit something by 11:30PM on the Saturday of the week of the lab, the scripts will be run on Sunday and you will get a feedback file so you can improve your work. Note you will not actually get an official grade on Brightspace at this time.
  • The final submission deadline is 11:30PM on Wednesday the week after the lab. You can submit as many times as you like, but at this time, the grading script will be run a second time on your latest submission only, and you will get an official grade.

Resources

Table of Contents